
Decorating paper with flowers and leaves: eco printing
Eco printing is a craft technique that allows the shapes and colors of flowers, leaves, berries and other plant elements to be reproduced on paper or fabric.
It is an environmentally friendly process that does not require the use of polluting chemicals and, in the case of printing on fabric, prefers natural, even better used, fabrics. By taking advantage of the natural dyes found in plants, paper and fabric are dyed without the use of ink.
Botanical printing can be done at home by anyone who feels like experimenting with this technique, giving room for creativity.
Origins
The origins of eco printing are very old: in the pharmacology manual “De materia medica” by Pedanius Discorides, a Greek pharmacist who lived in the 1st century AD, we find several medicinal plants imprinted on paper. The work, divided into 5 volumes, represents the most important handbook of medicine and pharmacy of the entire Greco-Roman era and was widely circulated during the Middle Ages and the Renaissance, helping to popularize this printing technique.

Botanical printing was in fact used by many scientists, botanists and perfumers to catalogue different tree species. Leonardo da Vinci, in his Codex Atlanticus, reproduced a sage leaf after sprinkling it with a mixture of oil and lampblack, also adding instructions for making the print. In the 16th century, Florentine perfumer Zenobio Pacini made a herbarium by pressing plants soaked in ink on both sides between two sheets of paper.

Instead, it was the German physician and botanist Johann Hieronymus Kniphof, in the 18th century, who sensed the commercial potential of this technique. At the time, interest in botany was growing, partly due to new species arriving from America and Africa. Kniphof then decided to publish a book on medicinal plants-the “Botanica in originali, das ist Lebendig Kräuter-Buch”-containing 200 plates made from dried, pressed and inked plants. A printing press and thin paper were used, so that the imprint of the plant could be imprinted more easily. The most valuable copies were also hand-painted.

To Alois Auer, an Austrian printer and illustrator, we owe the first publication on the botanical printing process. In his handbook “Discovery of the Natural Printing Process: an Invention,” published in 1853 in four languages, Auer illustrates his method of reproducing natural elements at full size using two plates, one of steel and one of lead.
Eco printing on fabric, on the other hand, was born in the mid-1990s, when Australian artist India Flint began experimenting with botanical printing, taking inspiration from the Latvian method of decorating Easter eggs and from shibori, the Japanese practice of dyeing and decorating textiles. In her book “Eco Colour: Botanical Dyes for Beautiful Textiles,” Flint illustrates different techniques for reproducing the shape and colors of flowers, plants, roots and barks on natural fabrics, creating distinctive and unique garments.

To learn more about the technique of eco printing on paper, we asked Grazia Bambino, founder of the brand Elementi Naturali and an artist specializing in botanical prints, to introduce us to the magic of this art with a tutorial.
Eco printing on paper: the tutorial
All it takes to make botanical printing are a few ingredients readily available on the market and a few simple tools. In this tutorial we will learn how to decorate paper using soy milk as a mordant.
Needed
- Sheets of watercolor paper
- Cooking twine
- A cylindrical wooden or iron stand for rolling the sheets
- Iron sulfate (1 teaspoon)
- Leaves and/or flowers of your choice
- Soy milk with no added sugar (500 ml) or a handful of yellow soybeans
- Water
- A steel pot or steamer
- A blender and sieve (only if making soy milk at home)
- Rubber gloves
- Two aluminum trays
Soy milk preparation
For home preparation of soy milk, proceed as follows: take a handful of yellow soybeans and soak them in water overnight. Then whisk the mixture, then strain it through a cloth-covered sieve. When most of the liquid has drained out, squeeze the cloth to get more.
Put the soybean pulp back into the blender, adding a little water, then blend and strain again. Repeat this step a couple of times. The remaining pulp can be composted or buried in the garden. Alternatively, you can use ready-made soy milk with no added sugar.

Paper etching
Pour soy milk into an aluminum tray and add a few pieces of paper. With brittle or thin paper, soak for several minutes. Softer paper, such as watercolor paper, can be left for several hours. It is best to etch only a few sheets at a time, otherwise they will tend to clump together and will not absorb the etchant well. You can use the paper right away or let it dry and use it later. The final result will vary depending on the strength of the etchant, the duration of the etching process, and the degree of absorbency of the paper you choose.
Paper Decoration
This is it: it’s time to indulge in botanical printing! Start by arranging on the paper the leaves and flowers you have chosen for the project, according to your personal taste. The most suitable plants are those rich in tannins, such as maple, walnut, eucalyptus and chestnut, but you can also achieve excellent results with species that have less dyeing power.
Iron sulfate preparation
Once you have completed your composition on the sheet, put on a pair of protective gloves and dissolve a teaspoon of iron sulfate in a liter of water inside an aluminum tray. Dip a cloth in the resulting solution, wring it out well and lay it on top of the composition, covering it with a few sheets of paper towels.
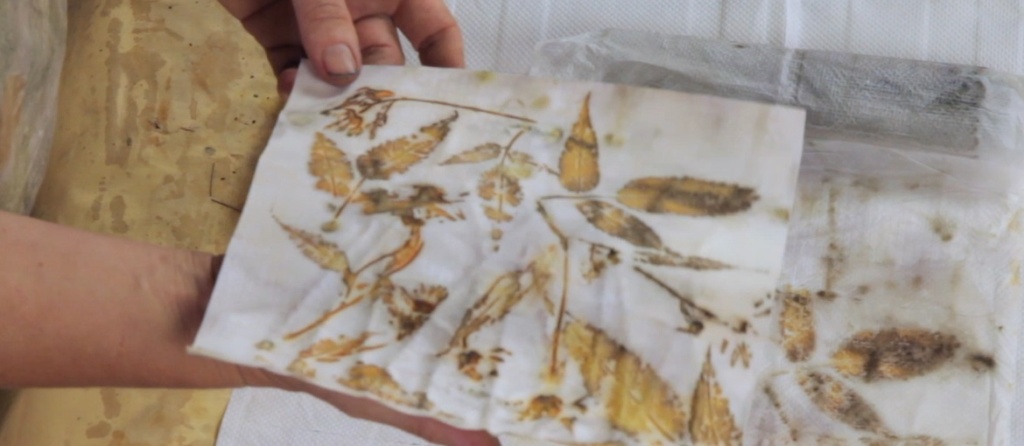
Now roll it onto a rigid cylindrical iron or wooden stand, tying it with kitchen twine, and cook for 90 minutes in a regular pot or steamer. Take the roll out and let it cool before opening. Voila, your botanical print is ready!
How to use it
Paper decorated with eco printing is a fine handmade product, perfect for packaging green items of various kinds, from cosmetics made with natural ingredients to eco-friendly crafts.

Alternatively, it can be used to make valuable and original gadgets, such as diaries, notebooks, photo albums, bookmarks, frames or paintings depicting all the beauty of nature.
If you feel like learning more about this artistic technique, visit Natural Elements’ Facebook page for more information about eco printing courses.